Frappe Whatsapp Integration
Getting WhatsApp Working with Frappe CRM: A Testing Environment Guide
Getting WhatsApp to work with Frappe CRM is no small feat. It requires navigating Facebook's developer ecosystem, setting up webhooks, dealing with version mismatches, and jumping between multiple platforms. If you've tried and hit roadblocks—or if you're about to start and want to avoid the pain—this guide is for you. We'll walk through the entire process of setting up WhatsApp in a testing environment, including the workarounds and lessons learned along the way.
In this article we'll cover:
- The exact version combination that works
- Setting up a Facebook Developer App for WhatsApp
- Configuring webhooks—including local testing with Tailscale
- Getting permanent access tokens (not just 24-hour ones)
- Filling out the WhatsApp Settings doctype in Frappe
- Common issues and how to fix them
1. Prerequisites – The Working Version Combo
After significant trial and error, here's the version combination that finally worked. Start here to save yourself days of headache:
| Component | Working Version |
|---|---|
| Frappe | 15.100.0 |
| Frappe WhatsApp | 1.0.12 |
| CRM | 1.59.0 |
2. Setting Up Your Facebook Developer App
This is where the journey begins—and where many people get stuck. Let's break it down step by step.
2.1 Facebook Account Requirements
First, a crucial note: use a Facebook account that has been active for a while. Brand new accounts often run into issues when trying to create business portfolios or access certain features. If your account is new, you might hit walls that have nothing to do with your configuration.
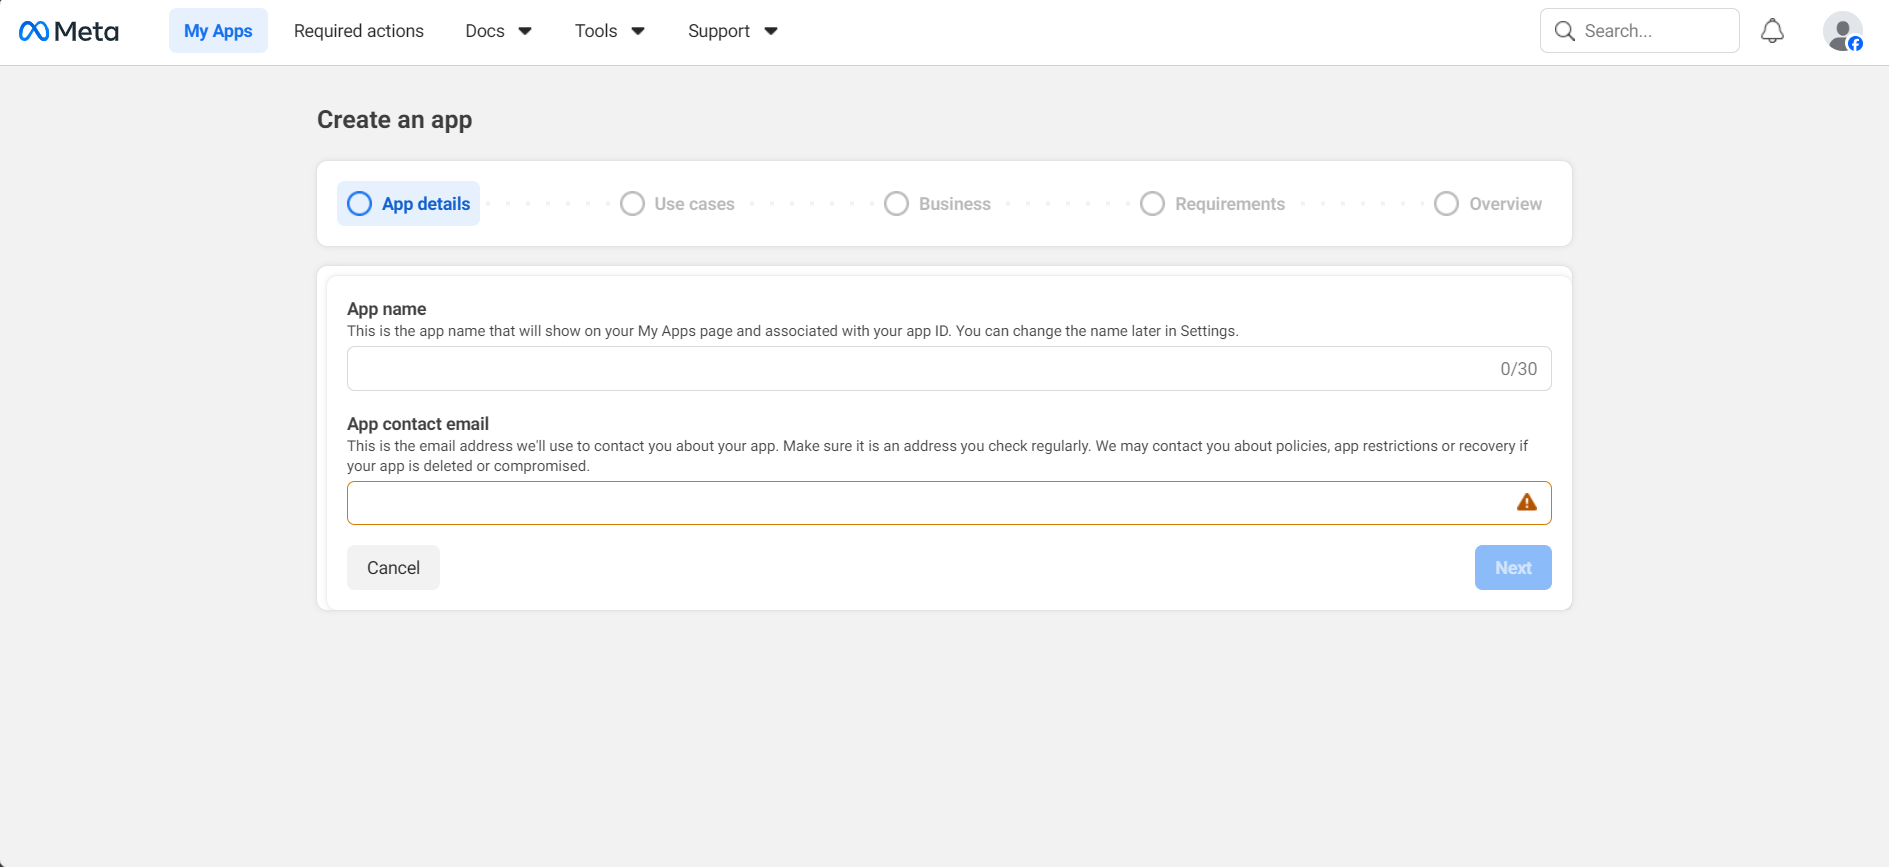
2.2 Create a Facebook Developer App
- Go to https://developers.facebook.com/ and log in.
- Navigate to your dashboard and click "Create App".
- Give your app a name.
- Select the use case: "Connect with customers through WhatsApp".
- Add a business portfolio (or create one if you don't have it yet). This portfolio will be important later, so remember which one you used.
- Check all the options and complete the creation process—you'll be taken to your new app's dashboard.
2.3 Access WhatsApp in Your App
From your app dashboard, find the WhatsApp section under "Use Cases" or in the sidebar. Click to start customizing—this is where we'll get the details needed to connect with Frappe.
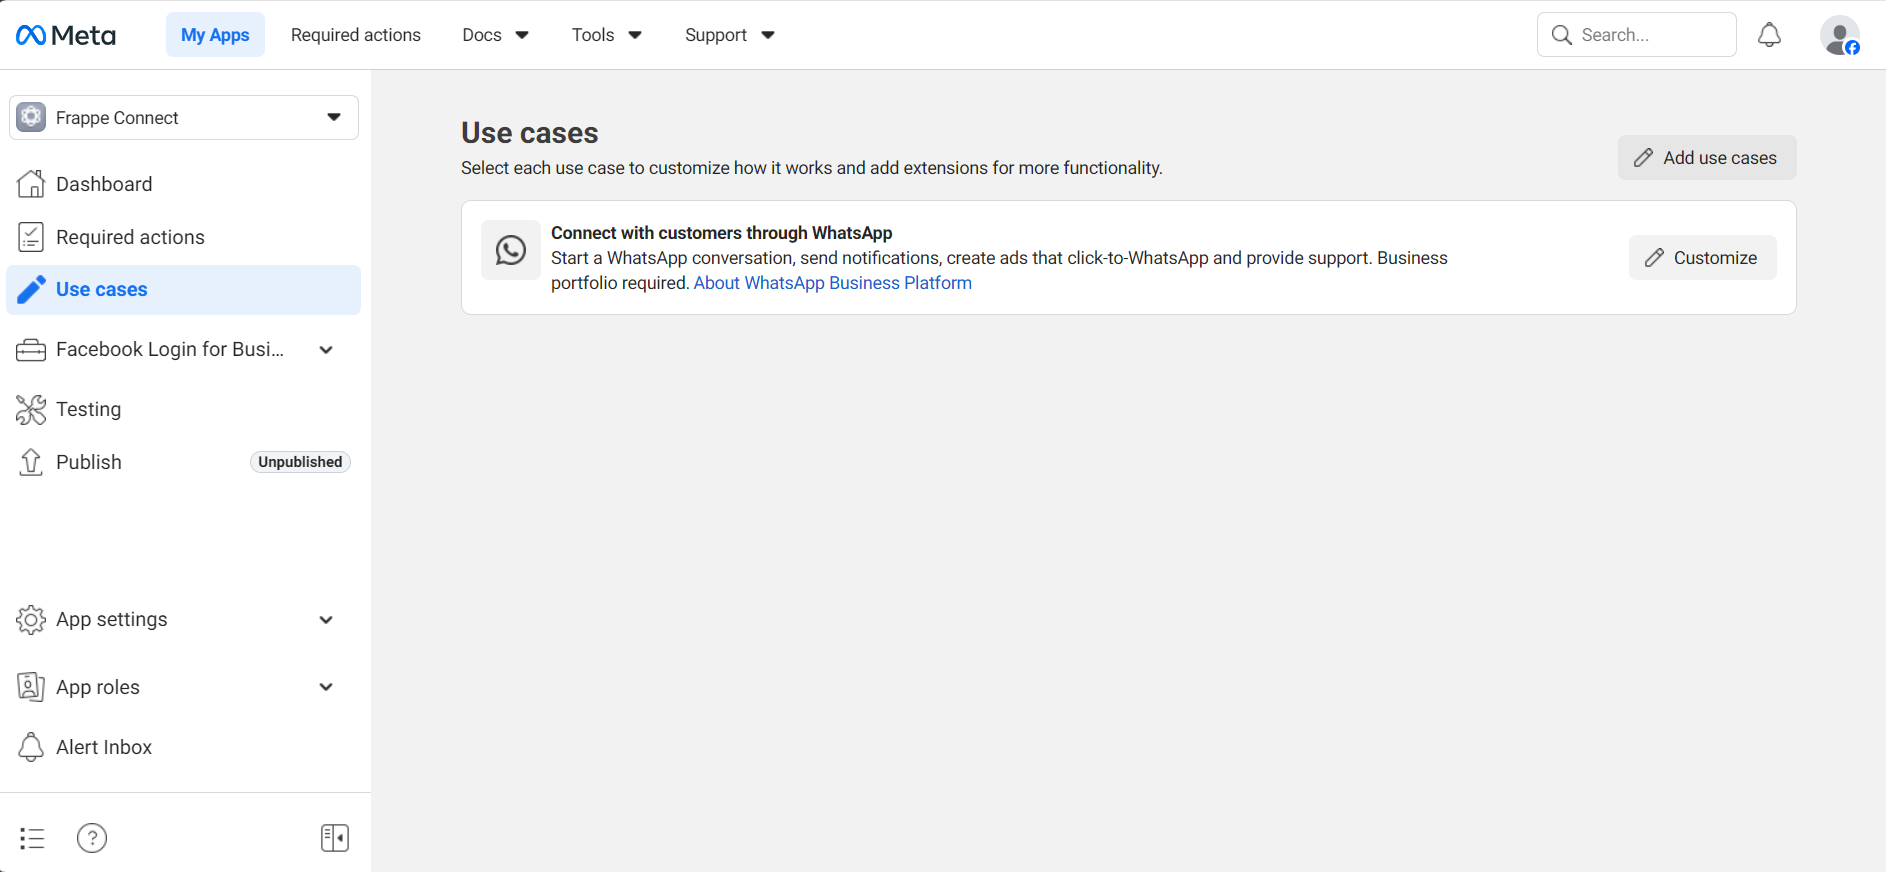
You'll be taken to the Quickstart guide. From here, we can start using the API immediately.
3. Getting Started with the WhatsApp API
3.1 The Test Number
Facebook provides a test phone number that works for 90 days—perfect for testing. You can also add a number you want to send messages to (like your personal phone) to test that everything works. Send a test message and you should receive a "hello world" response.
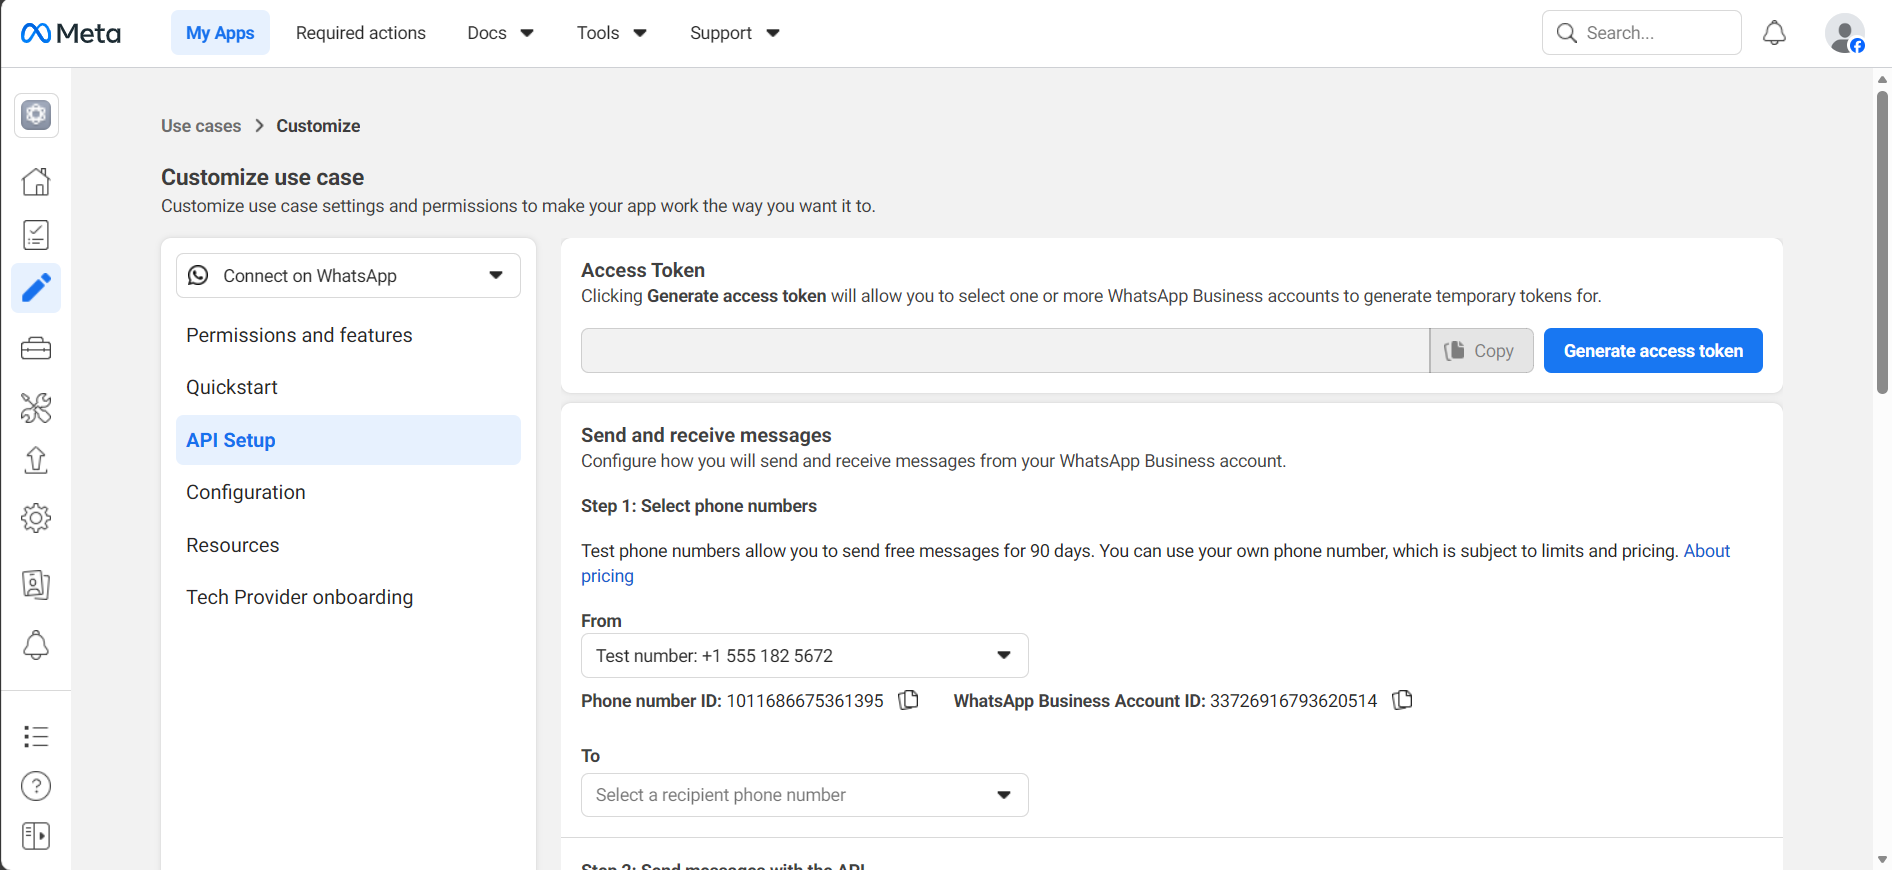
3.2 Temporary Access Tokens
You can generate an access token here, but be warned: it only lasts 24 hours. We'll get a permanent one later, but for initial testing, this works.
4. The Webhook Setup – Two Approaches
Webhooks are how Facebook tells your Frappe instance about incoming messages. This is often the trickiest part, especially in testing.
4.1 The Challenge: Your Site Needs to Be Public
Facebook needs to reach your webhook URL. In production, this is easy—you have a public domain. In testing, your local instance is usually behind a firewall. This is where Tailscale Funnel comes to the rescue.
4.2 Setting Up Tailscale for Local Testing
- Install Tailscale on your machine and set up an account (both free).
- Make sure your Frappe instance is running locally.
- Open a terminal and run:
tailscale funnel {port}(replace {port} with your frappe port, usually 8000 or 8080). - You'll get a URL like:
https://{machine-id}.tailaef7e6.ts.net/
4.3 Configuring the Webhook in Facebook
In your Facebook app dashboard, go to WhatsApp → Configuration. You'll see fields for webhook configuration.
Callback URL: Enter your Frappe webhook endpoint:
https://{your-url}/api/method/frappe_whatsapp.utils.webhook.webhook
If using Tailscale, it will look like:
https://{machine-id}.tailaef7e6.ts.net/api/method/frappe_whatsapp.utils.webhook.webhook
Verify Token: Choose any string (like a password) and remember it—you'll need it in Frappe.
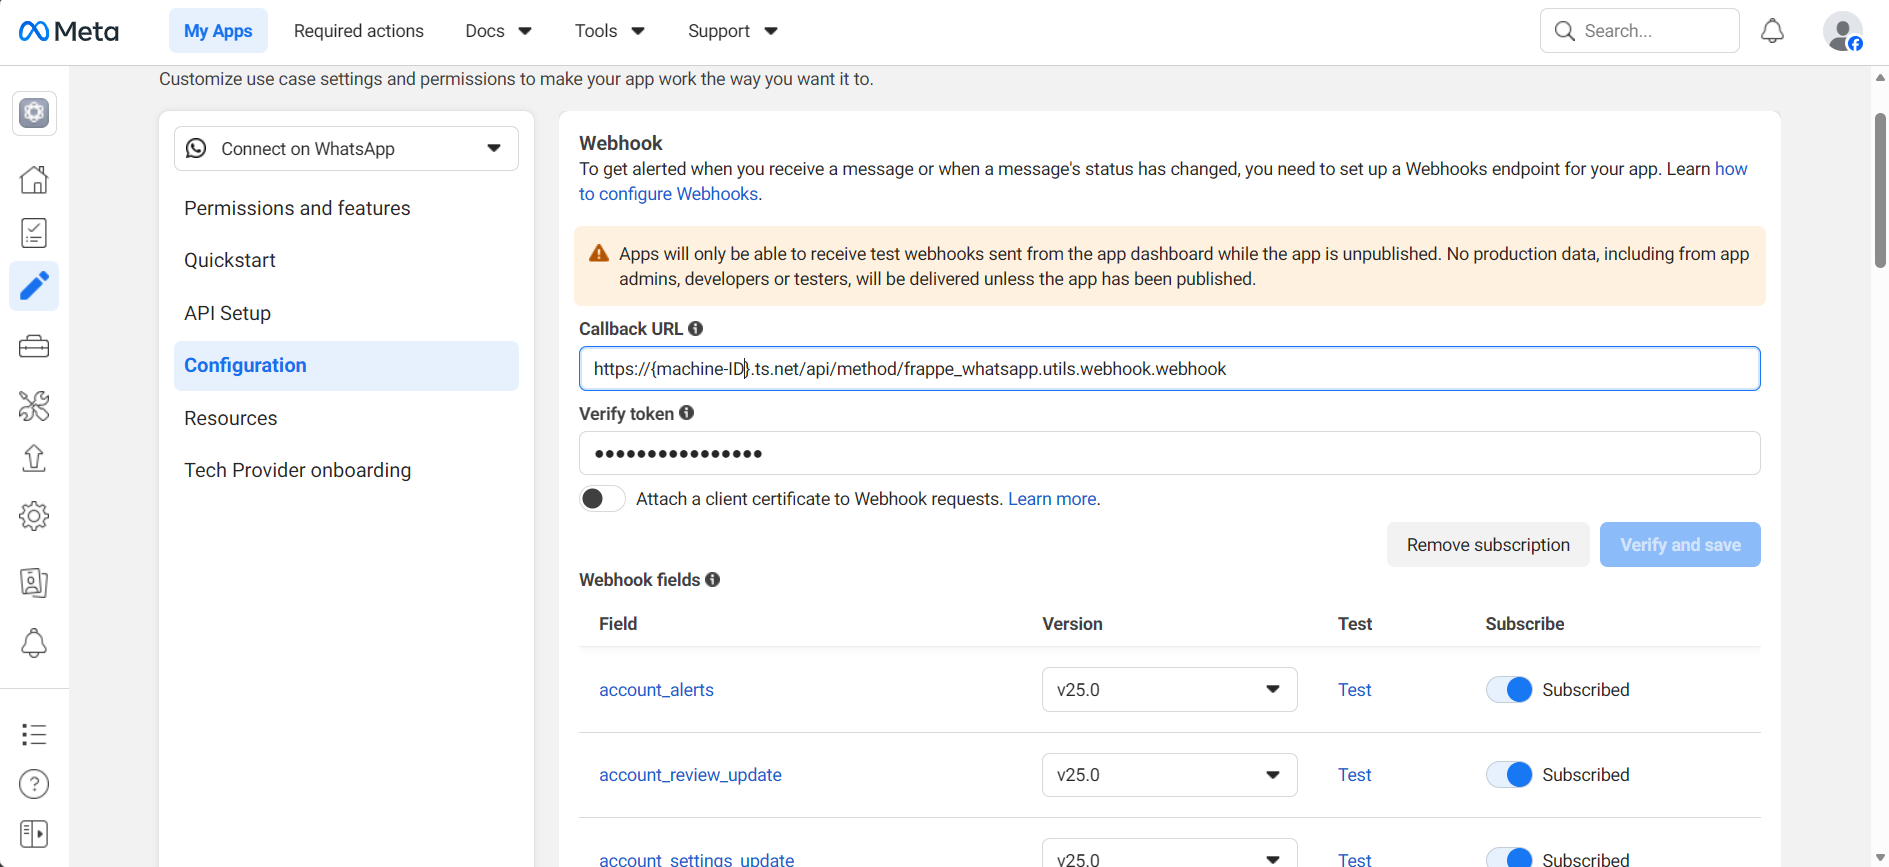
Click "Verify and Save". If it works, you're in business! If not, check:
- Your Tailscale tunnel is running
- The URL is correct
- Your Frappe instance is running
- frappe_whatsapp is installed
5. The Frappe Side: WhatsApp Settings
Now let's jump into Frappe. This is where all the pieces come together.
5.1 Finding WhatsApp Settings
In your Frappe instance, search for "WhatsApp Settings" in the Awesome Bar. This will take you to the WhatsApp Account setup page.
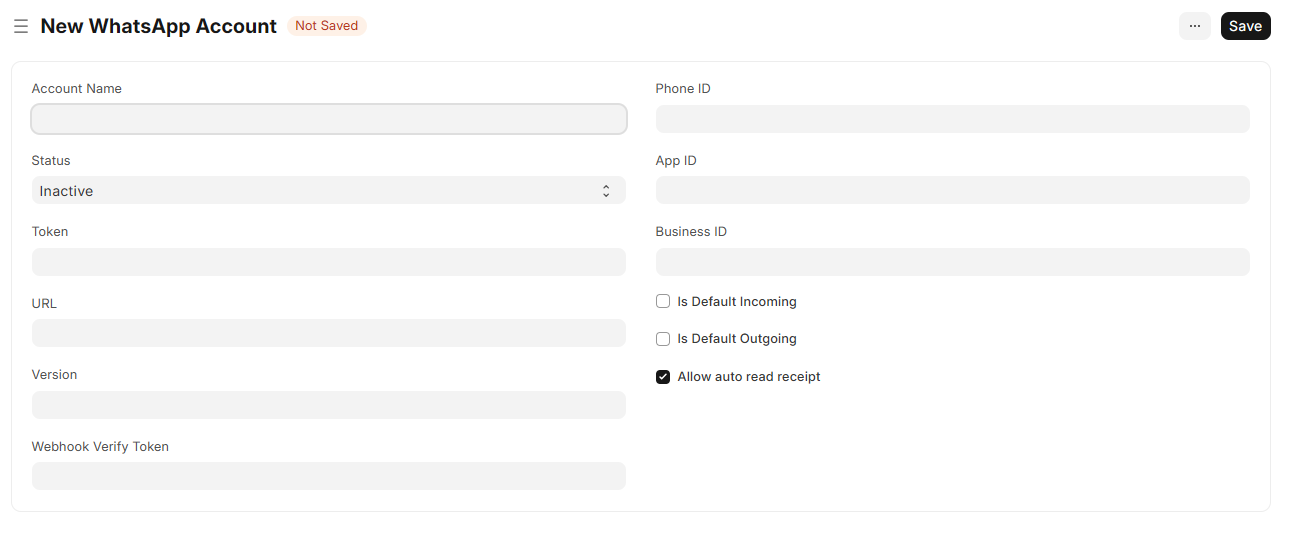
5.2 Filling Out the Fields – One by One
At first glance, it looks like a lot. Let's tackle them systematically:
| Field | Where to Get It |
|---|---|
| Account Name | Your choice—whatever helps you identify this account |
| Webhook Verify Token | The same token you set in Facebook webhook configuration |
| URL | https://graph.facebook.com (this is the API endpoint) |
| Version | e.g., v25.0 (check Facebook docs for current version) |
Ctrl+S after every change. Get in the habit now—it will save you tears later!
5.3 Testing the Webhook Connection
Once you've saved these fields, go back to Facebook and try the webhook verification again if you haven't already. If it works, you'll see a success message and additional options will appear.

After successful verification, subscribe to these fields:
- messages – to receive incoming messages
- message_template_status – for template updates
6. Getting Permanent Access Tokens
That 24-hour token from earlier won't work for long-term testing. Let's get a permanent one.
6.1 Navigate to Business Settings
In your Facebook app dashboard, scroll down below the webhook fields. You'll find a link to set up a permanent token. This will take you to:
https://business.facebook.com/
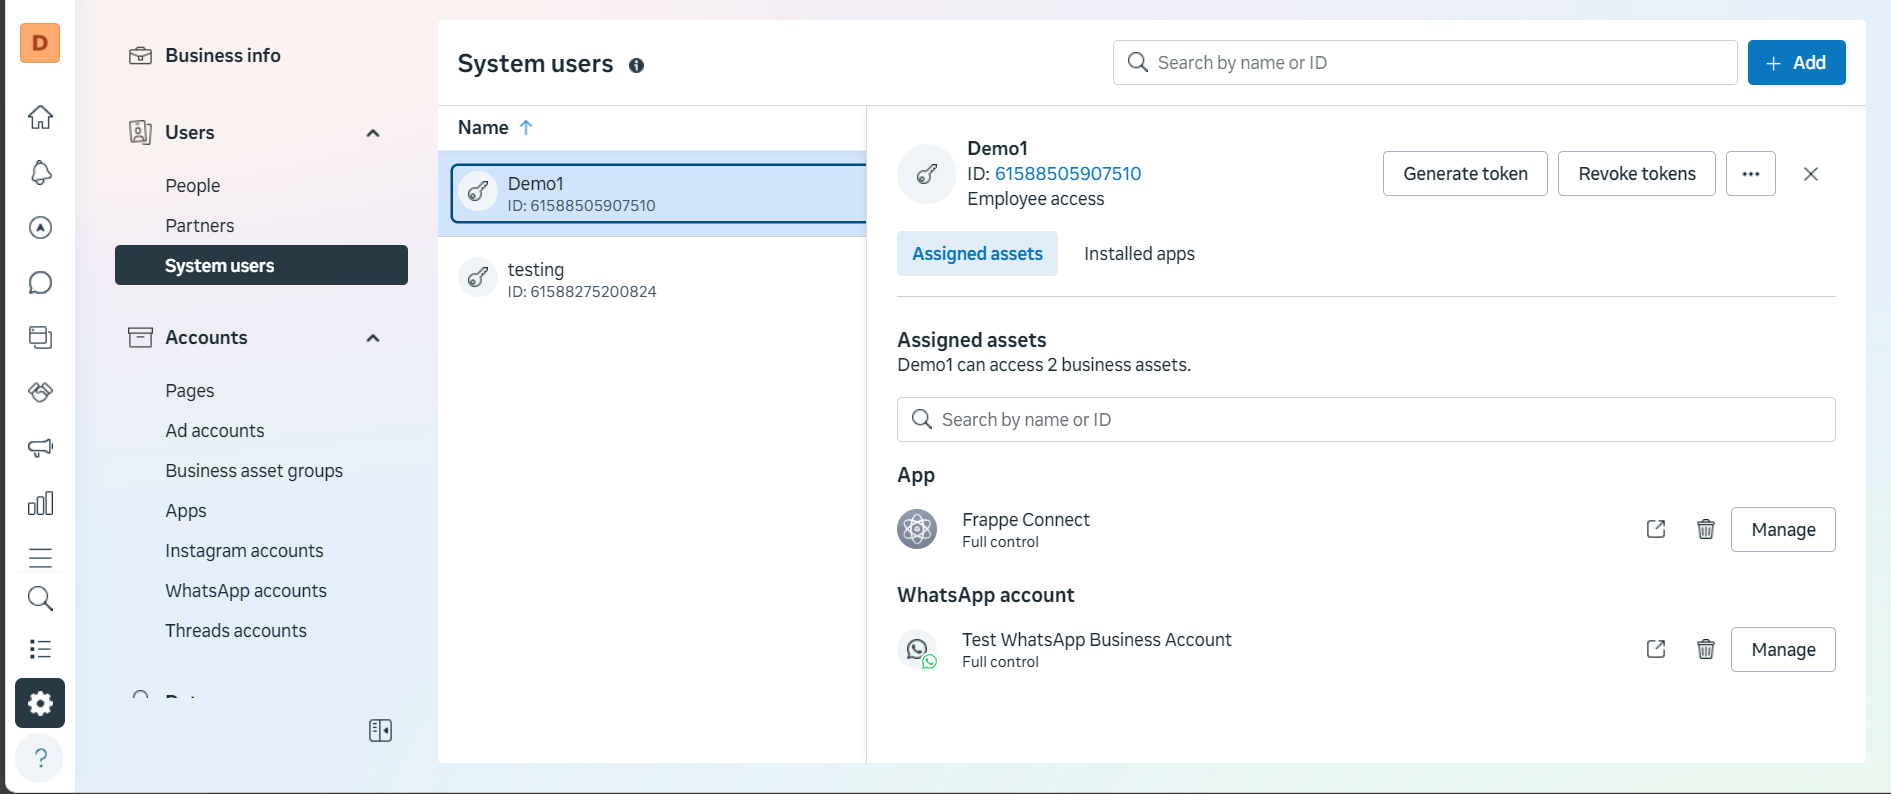
6.2 Create a System User
- In the sidebar, look for System Users.
- Add a new system user.
- Give this user full control over your app.
6.3 Assign Assets to the User
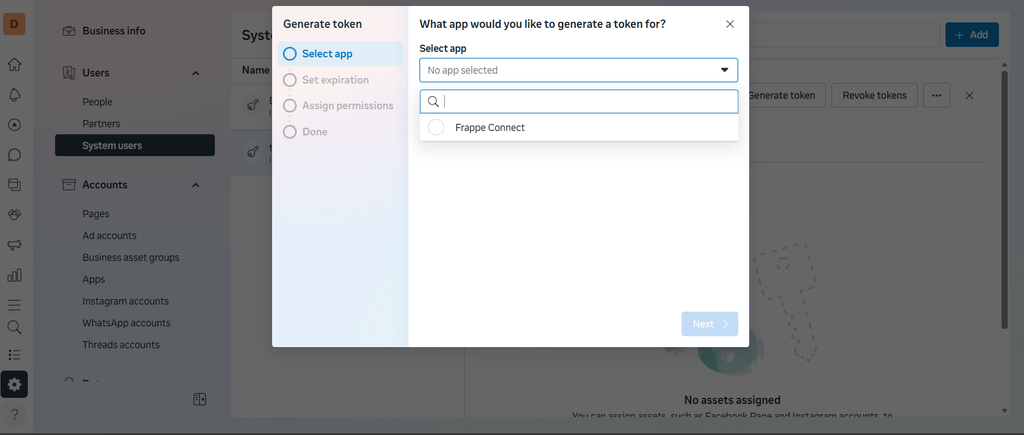
- Select the app you created earlier.
- Give the user full permission to the app.
- Also assign the user to the WhatsApp account (it will appear in the sidebar once you select the app).
- Select your company and assign the user there too.
6.4 Generate the Permanent Token
Back in the System Users page, you'll see an option to Generate Token. Create one and save it immediately—you won't be able to see it again!
Paste this token into the Token field in your Frappe WhatsApp Settings.
7. Gathering the Final IDs
We need three more IDs to complete the setup:
7.1 App ID
In business.facebook.com, go to Accounts → Apps in the sidebar. Find your app—the ID is listed there. Copy it to the App ID field in Frappe.
7.2 Business ID
Go to WhatsApp Account tab in business settings. Select your business. Under the account name on the right, you'll see an ID. This is your Business ID.
7.3 Phone Number ID
Back in your Facebook app dashboard under WhatsApp API Setup, find your test number. Next to it is the Phone Number ID. Copy this to Frappe.
8. Final Configuration in Frappe
You should now have all fields filled:
- ✅ Account Name
- ✅ Webhook Verify Token
- ✅ URL (https://graph.facebook.com)
- ✅ Version (e.g., v25.0)
- ✅ Token (permanent one)
- ✅ App ID
- ✅ Business ID
- ✅ Phone Number ID
Save everything one last time. Then enable the options you want (like auto-reply, etc.).
9. Connecting WhatsApp to CRM
9.1 Select the WhatsApp Account
In WhatsApp Settings, make sure your newly created account is selected as the default.
9.2 Configure CRM Settings
- Go to CRM Settings (search for it in the Awesome Bar).
- Find the WhatsApp section.
- Select the WhatsApp account you just created.
- Save the settings.
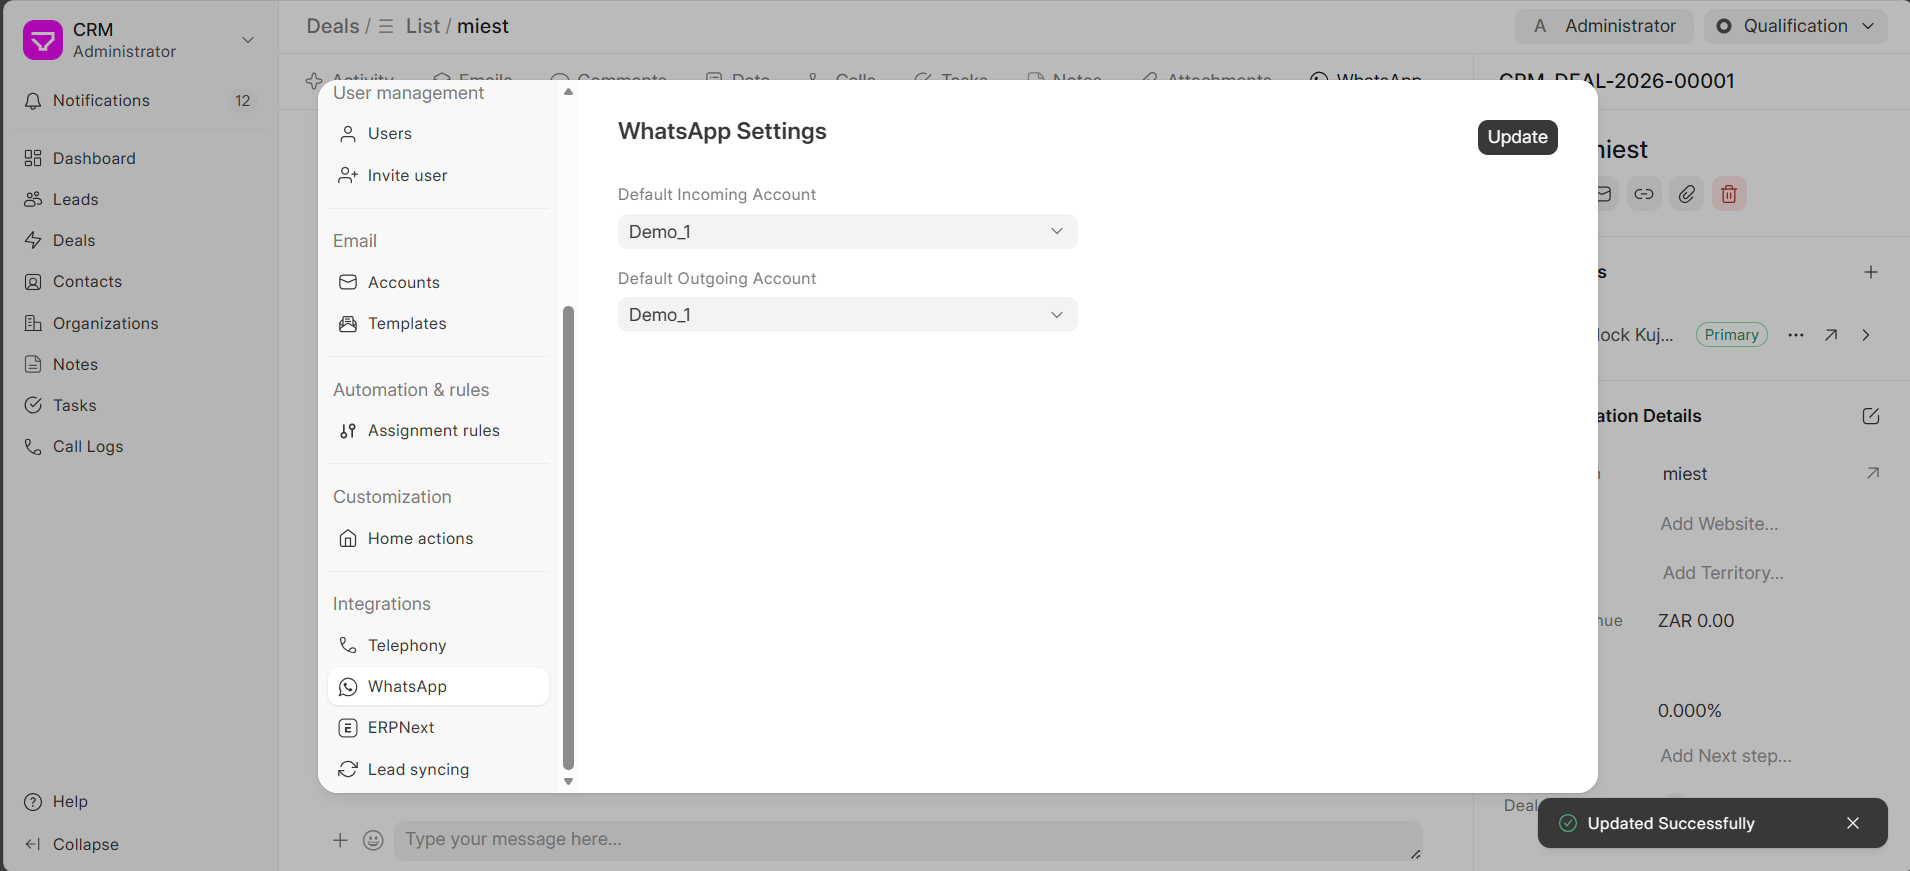
9.3 Refresh and Test
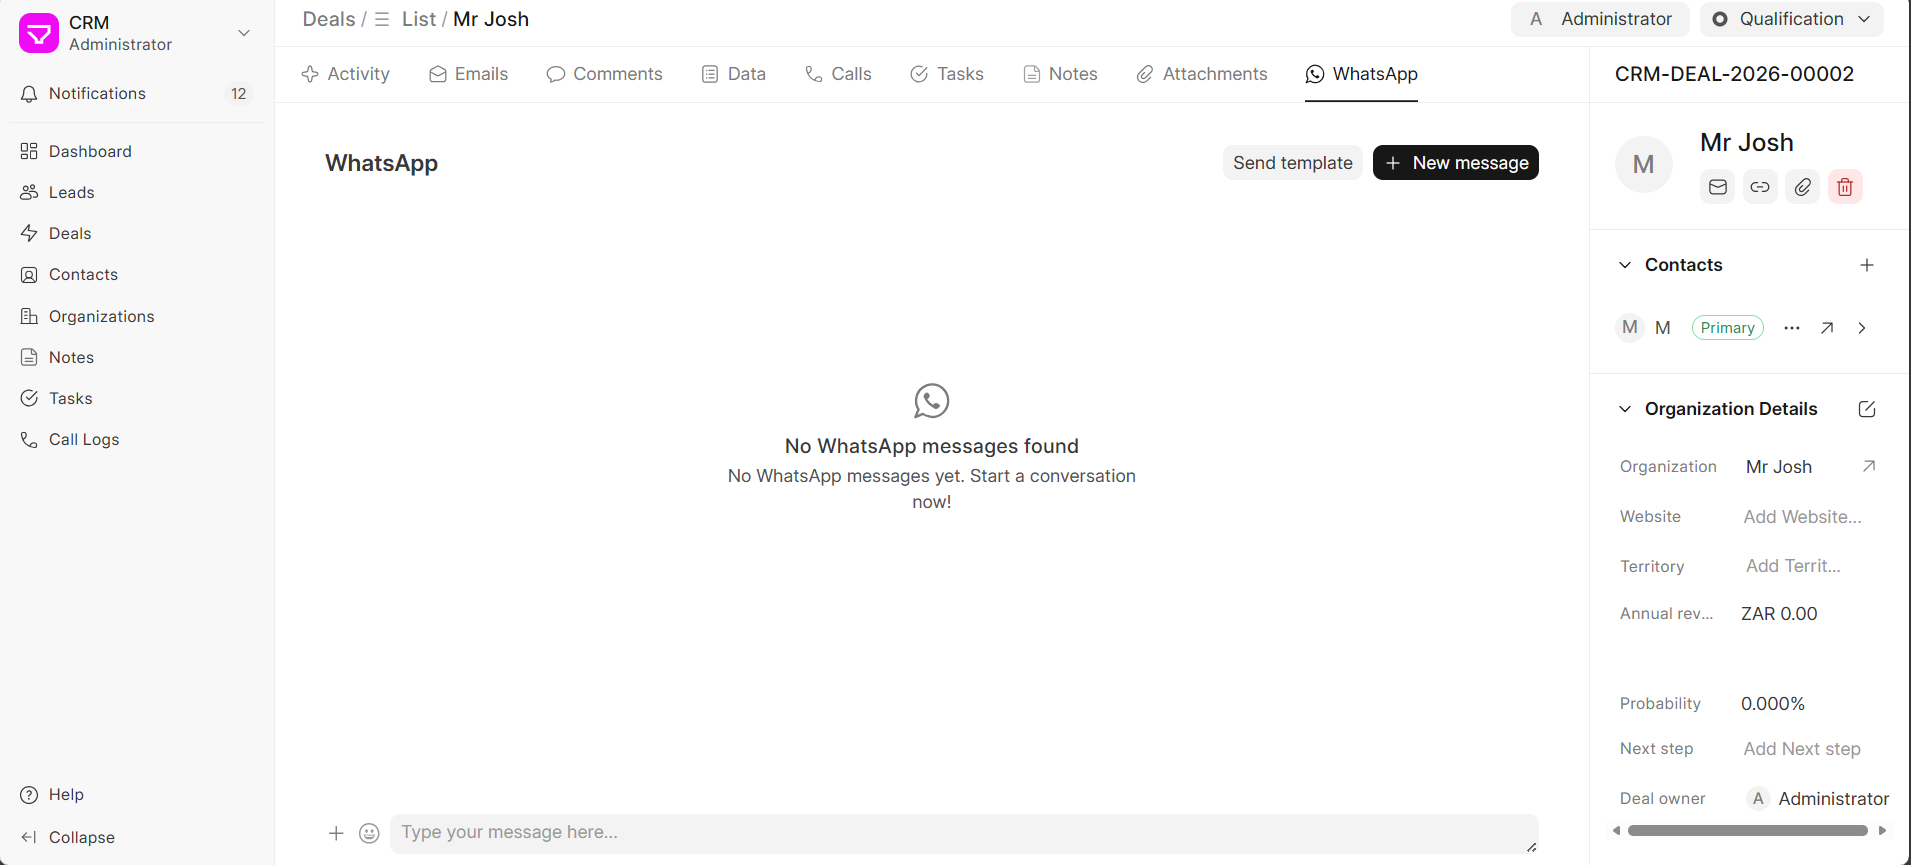
Refresh the page—this is important. Once refreshed, you should see WhatsApp integration in your Deals and Leads.
10. Known Issues & Workarounds
| Issue | Workaround |
|---|---|
| WhatsApp tab not appearing in Deals/Leads | Check Frappe version (must be ≥ v15.93.0). Upgrade if needed. |
| Notifications not showing—need to refresh to see new messages | This is a known limitation in testing. Check for frappe_whatsapp updates or implement custom socket events. |
| Messages not linking to correct Deal/Lead | Verify phone number formats match exactly between WhatsApp and CRM records. |
| Webhook verification fails | Check Tailscale tunnel is active, URL is correct, verify token matches exactly. |
| Cannot create business portfolio with new account | Use an older Facebook account or let the new account age a bit before trying. |
11. TL;DR – Quick Reference Guide
# 1. Version Check First!
Frappe ≥ 15.93.0, frappe_whatsapp 1.0.12, CRM 1.59.0

# 2. Facebook Developer Setup
- Create app with WhatsApp use case
- Get test number and temporary token

# 3. Webhook Setup
- For local testing: tailscale funnel
- Callback: {url}/api/method/frappe_whatsapp.utils.webhook.webhook
- Verify token: choose your own

# 4. Frappe WhatsApp Settings
Fill: Account Name, Verify Token, URL, Version
Test webhook, subscribe to messages & templates

# 5. Permanent Token
- Business settings → System Users
- Create user with full control
- Assign app and WhatsApp account
- Generate and save token

# 6. Gather IDs
App ID, Business ID, Phone Number ID

# 7. CRM Connection
Select account in CRM Settings → Refresh page
Wrap-Up
Yes, this is a long process. Yes, there are many moving parts. But once it's working, WhatsApp integration transforms how you interact with leads and deals—all from within Frappe CRM. Messages come in, they link to the right records, and your team can respond without switching contexts.
The setup is complex, but the productivity gain is worth every minute spent. And now you have a battle-tested guide to get through it without the trial and error.
Happy messaging!
No comments yet. Login to start a new discussion Start a new discussion